MuuMuu101's 68 Dart, A Learning Process...

-
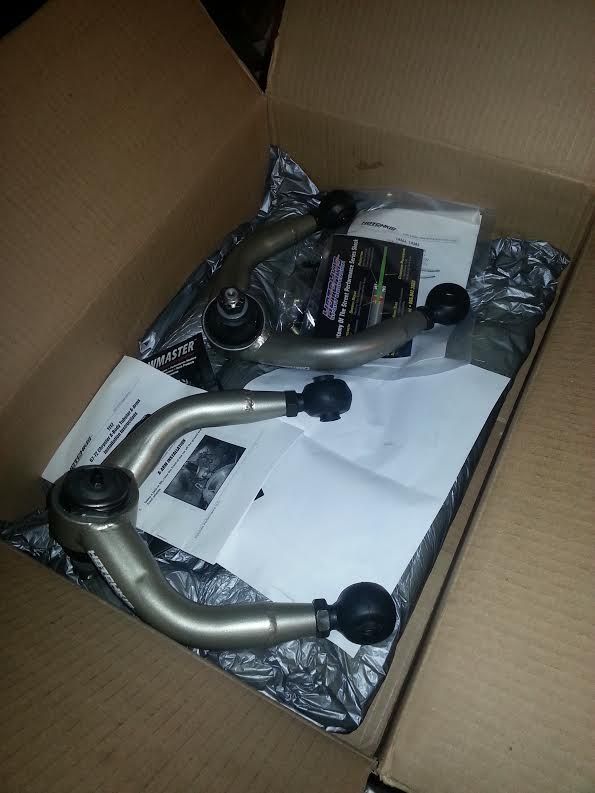
i love getting parts in the mail; so be honest did you open up all the parts and lay them out on the floor? my wife was yelling at me a few months back for having parts all over the living room when i ordered my sway bars and other stuff.

also when you change the parts, i would ask your mechanic to save the front and rear spring hangers & shackles, oem front t-bars. you could probably sell them here and recoup a few bucks

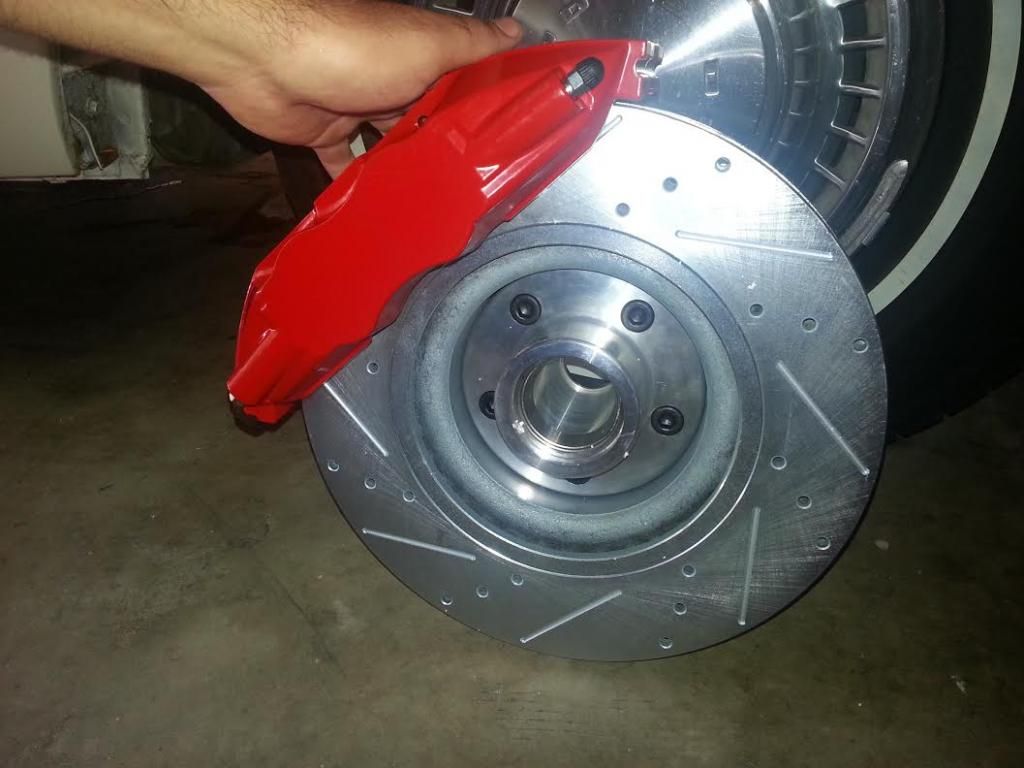
I was actually good about it. I left the parts in the corner of my garage for 5 days and barely opened 2 boxes last night as I was curious what was in what box. I'm sure I would have done it sooner if I was installing the parts, but I'm not so I just left it how it was. As for the brake parts, I tore that box right open once it got home.

As for the parts, I want to save them all; however, I'm unsure if I want to sell them or save them for another project (like an early A) later on. I believe the 273 Darts came with 4.5 leaf springs and small block t-bars so it would be a mild improvement for a slant six car. Or, again, I could resell them to negate the loss or to put the money into other parts.
 
Well, I got some progress done Saturday and today. I tore apart my 8 3/4 and am getting it ready for a rebuild. It's the first time I've ever done something like that and I'm happy I was able to do it alone. I'm slowly facing my anxiety complex.
biggrin.gif
Anyways, I've got it down to a bear housing. The carrier was a bit tricky pulling out on my own and I accidentally spilled almost all the spare diff oil.
rant.gif


Now the next step is to clean the housing and get it painted or powdercoated before a friend of mine reassembles it. I just am not sure how at the moment. But, once it's powdercoated new bearings, bbp axles, 3.55 gears, and a Eaton TrueTrac is going in. My friend has been rebuilding 8 3/4 for 30 years or so, so I'll have him put it together. While he's doing that, I'll order my brake kits from Dr Diff. Once that's installed I'll be able to measure my custom wheels and hopefully get a 275/35/18 to fit all the way around. My goal is to get rear end, brakes, wheels, tires, and Hotchkis TVS done by the last weekend in September. If there's time and money, maybe a new engine and/or trans will go in. This GT is going to stand for something new, "Gran Turismo." I'm excited!
biggrin.gif
 

Attachments

  • unnamed.jpg
    48.2 KB · Views: 783
  • unnamed1.jpg
    43.6 KB · Views: 746
Baby, mini update. I'm still cleaning the housing. It's tough to get all the little 40 year old dirt and grease clumps off of it. I'm going to my diff builder friend's this weekend to drop this stuff off so maybe I'll clean it there because I know he's got a proper cleaning station. I also ordered my entire rebuild kit from Dr. Diff and man is it pricey, but hopefully this diff will get built before the end of the month. Then all I'll need to do is order my brake kits from him next month and I'll have 95% of the pieces to put this car together.
biggrin.gif
The 5% is for the unknown.
laugh2.gif
 
This morning I took the 8 3/4 housing over down to a friend's place and we pressure washed it to get all the grease and grime off. After that I brought it back home, made a trip to Home Depot, rubbed it with a fine steel pad and some mineral spirits, and shot a couple coats of primer over it.
 

Attachments

  • 20140704_144906.jpg
    29 KB · Views: 705
  • 20140704_155520.jpg
    33.5 KB · Views: 745

I'm further along, I just haven't had time to update this thread. The 8 3/4 is almost put together. I just got my brake kit today so hopefully I'll have it together before the end of the week and possibly get started on the front suspension.
 
So, things are finally moving with the Dart. First things first, I bought a sweet flip top gas cap from a FABO member that I hope to put on my Dart with an adapter ( http://fliptopcapadapter.com/about.html )...

http://s1127.photobucket.com/user/m...e Dart GT/fliptopgascap1_zps1845e89d.jpg.html


Next on the list... I purchased the Dr Diff front and rear brake kit. I got the 13" rotors up front with the Brembo looking calipers and in the rears I got the 11.7" kit with the Mustang calipers.

Rough mach up of what the fronts would look like:

http://s1127.photobucket.com/user/m...GT/13inchdiscbrakemachup_zps2f980107.jpg.html

Today I did a lot of work putting the 8 3/4 together. In the past weeks I've managed to install the carrier onto the housing. Today I installed the axles, adjusted for play (with help from a friend), and bolted on the brakes. I still need to do lines but was tired and gave up for the night.

http://s1127.photobucket.com/user/m...liperspacerandfoamgasket_zps0bb7a895.jpg.html

http://s1127.photobucket.com/user/muumuu101/media/1968 Dodge Dart GT/axlesin_zpseb83c736.jpg.html

http://s1127.photobucket.com/user/muumuu101/media/1968 Dodge Dart GT/rotorson_zps7f704fce.jpg.html

http://s1127.photobucket.com/user/m...ge Dart GT/875donealmost_zpsa7838abb.jpg.html

Ignore the mess...

So, hopefully during the week I can manage and finish up the lines.

Next weekend, I guess, would be the start of installing the front brakes and Hotchkis TVS. It's kind of a scary thought. I definitely don't want this to be one of those eternal never ending projects. I need to get the car driving again (after the suspension, brakes, wheels, and tires replaced) before the start of October. I think it's doable. I may need some help along the way.
 
Thanks guys. I got my adapter for my flip top gas cap today but it's pretty much a solid spacer. I guess I'm supposed to drill holes into this as the instructions were just a picture.

http://fliptopcapadapter.com/faq.html

that seems kinda skimpy on the companies part to charge 45 big ones and then you still have to drill it.

when I did mine I cut where the reliefs need to be into the 1/4 with a cutoff wheel then pounded it in to clear the cap and welded the cutout area to seal the 1/4......if that makes any sense. That way the cap is a bit more flush looking like on a cuda.

The website says the 3 holed ones are supposed to work. The only way I see it working is if I drill and counter-bore the 4 holes for it to mount to the quarter panel and screw the adapter down, then drill tiny holes to screw the cap onto the adapter so it isn't raised by the screw heads. Or, I can drill 2 holes into the cap and 4 holes into the adapter to just utilize 4 screws.
 

Attachments

  • Adapter_Instructions_800x827.jpg
    17.1 KB · Views: 601
So I got a lot of work done today. I called my friend over, he's got a '71 Demon, and in 4 hours we tore apart the entire front and rear suspension. The car is a hovercraft now. http://board.moparts.org/ubbthreads/images/graemlins/alien.gif Anyways, when I was taking apart the front, I noticed the LCA bump stop was just chilling on the driver's side and the spot welds that held that bracket on the LCA had broke. Luckily I've got extras or could have my friend reweld them on. I figure since the LCA's are out, I might as well get stiffening plates. We also are going to have to make new lines in the front. The fittings that connect to the front brake hoses were rounded off so we had to cut the line. The way we're probably going to do it is run the line around the core support to clean up the firewall a bit. We might even add a line lock just for fun. Besides that, there were really no bad issues. Everything was pretty straight forward. I've got a lot of degreasing to do under there because it's disgusting. We were black afterwards. http://board.moparts.org/ubbthreads/images/graemlins/puke.gif

A friend of mine also has some Bullit Mustang wheels lying in his garage. They're 17 x 8" and have 245/45/17's on the front and possibly 275/40/17's on the rear so they'd be good wheels for a mach up.

Next weekend, we'll probably install the rear end and leaf springs.

I just have to remember that anything I order, I have to make sure it gets in by Friday.

So things on the To Do List...
1) Degrease/clean
2) Plate and install new bushings in the LCA's
3) Redo the front lines and possibly add a line lock
4) Install 8 3/4 rear end with leaf springs.
5) Cut and balance driveshaft
6) Install front suspension and brakes
7) Borrow friends Bullit Mustang wheels and measure wheel size.
 

Attachments

  • unnamed.jpg
    34.3 KB · Views: 548
I didn't get as much done as I wanted to today, but any progress is better than no progress. We started just checking everything on the calipers and making sure everything cleared. I ended up removing all my caliper spacers as we noticed that the rotors would hit the inside of the caliper. After that we started working on redoing the rear lines. My friend's flaring tool (manual/mechanical) didn't like the plastic coating it's got on the lines. We even sanded it off and tried it but the flares were sub-par. So we're going to borrow another one of my friend's hydraulic flaring tool and hopefully that should do the trick. We also decided to throw the rear end under the car. It was actually quite a bit more work than expecting but we finally fit it.

Tomorrow our goal is to finish the lines that go on the differential and start the lines up front. I decided to just copy the factory lines and have it follow the path on the firewall. The new proportioning valve and line-lock (burnout button) came in today as well as some bump stops and other small goodies.
thumbs.gif
 

Attachments

  • rear end in.jpg
    24.2 KB · Views: 554
  • disc brake in car.jpg
    31.8 KB · Views: 544
Got a little more work done today. We finished the lines on the differential, installed the shocks, and torqued everything down. We were having trouble removing the lines from the distribution block up front. There's not much room to clear a wrench between the steering box and the exhaust. So, we may just end up cutting it and going over to the original idea of bringing the line around the frame rails and core support with a T-block. While we're at it we're going to have to redo the lines that go from the front to the rear to the car as they cross the path of the subframe connectors.

I also am going to start cleaning the LCA's sometime this week. I've still got to remove the strut rods (don't have the tooling to get enough torque to remove the nut), weld on a bumpstop bracket (the spot welds broke off), weld on the stiffening plates, and install the pin and bushings. Once the front lines are done, the front suspension can slowly be assembled.

All the work isn't going to get done before the September 25th, but hopefully we can finish it off before Fall Fling, October 25th.
 
Got a little more done today... My friend made the lines that go from the MC to the prop valve and line lock for a quick mach up. The mounting bracket will be a plate connected to the MC bolt and sandwiched between the two. We ran out of lines and fittings today so tomorrow we're going to head to NAPA and see what they've got. We've already emptied out Autozone over the weekend even though they didn't have much.
tongue.gif


I also started cleaning up and degreasing the LCA's. The stiffening plates should be here tomorrow so hopefully we can have the new bushings, pins, and plate welded in by Wed or Th.
luck.gif


While I was removing the distribution block today (after all the lines were cut), I wasn't paying attention while I was unscrewing the bracket that holds the block and it fell on my head. I only bled for a minute or so.
laugh2.gif
 

Attachments

  • MC, Linelock, and Prop Valve.jpg
    74.5 KB · Views: 526
Dam, looking good. you sure made some awesome progress.

Brake line bends looks good. Did you get a chance to try the mustang wheels?
 
Dam, looking good. you sure made some awesome progress.

Brake line bends looks good. Did you get a chance to try the mustang wheels?

That's my friend's work... He's like a "master tinkerer." Everything he does has to look beautiful as he really puts all of his time and effort getting every detail looking perfect lol. I just care that it functions as it should.

I'm not focused on the wheels right now as I haven't started installing the front suspension. The Mustang wheels would only be temporary and for mach ups. Another friend said I could borrow his but I haven't talked to him in a couple weeks. I'm not even sure they'll fit with the large front brakes. I'm most likely going to try to get 2 piece wheels. Just the brake stuff is nickel and diming me to death.
 
While I was removing the distribution block today (after all the lines were cut), I wasn't paying attention while I was unscrewing the bracket that holds the block and it fell on my head. I only bled for a minute or so.
laugh2.gif

hahahaha

a part of the job i do is fix computers , when i cut myself working on one it becomes a matter of BLOOD then i have to finish the repairs no matter what lol

nice progress
 
So, I stopped by an offroading shop today to buy the last of the brake parts. I bought my T block and some "clips" to hold the hard lines across the body. The clips are way over built (they're machined aluminum parts) and were extremely stupid expensive so I hope I don't use all of them so I can return a majority of them.

I also went to a mopart member's house today after work and had him weld up my LCA braces and one of the bump stops that broke off one of the arms. It's crazy how there was literally no slop in either of the arms.
 

Attachments

  • LCA brace.jpg
    50.6 KB · Views: 529
Got some more work done today. I spent some time with the suspension while my friend worked on the lines a little bit more.

So suspension wise, my focus was on the LCA's. I was able to paint them, install the bushing and greasable pins, and install the bump stops (itty bitty ones from Energy Suspension). They came out pretty darn good. (The flash in a dark room makes them look like there's primer everywhere).

http://s1127.photobucket.com/user/m...odge Dart GT/completeLCA_zps608ea92a.jpg.html

I was also able to install some rod end boots on my UCA's just as a little security precaution...

http://s1127.photobucket.com/user/m...e Dart GT/UCArodendboots_zpsceee32a1.jpg.html

So for the brake lines we decided to go with the frame rail idea and here's the path we took...

http://s1127.photobucket.com/user/muumuu101/media/1968 Dodge Dart GT/brakeT_zps1905cba6.jpg.html

http://s1127.photobucket.com/user/m...e Dart GT/driversideline_zpsfef04c7c.jpg.html

http://s1127.photobucket.com/user/muumuu101/media/1968 Dodge Dart GT/frontlines_zps4193a366.jpg.html

The front to rear lines are going to mount on the inner side of the subframe connectors and connect to the back. The passenger side still isn't done but it's going to be made similar to the driver side.

Also as a cool, quick, little fact. I had 0.87" T-bars (which I believe are 340 car size) in my car just because it had AC. I just thought that was kind of neat.
 
While my friend and I were working on my Dart, I had to go in for a little but when I walked back into my garage, my friend was talking to someone in the driveway. I asked my friend what's up and he said, "Some guy wants to buy your car." The guy was parked at the end of my driveway (blocking it completely) and standing next to a new Hyundai Genesis. My garage is perpendicular to my driveway and was about 10-20 ft away so he couldn't have seen much of the Dart. So I walk out a little more and said...

Me: "Howdy."

Stranger: "Is your car for sale?"

Me: "Which car?" (Hoping he'd say my '11 Scion tC or my mom's husband's '01 Focus in the driveway. Deep down inside I knew it was my Dart)

Stranger: "Your Dart."

Me: "Nope."

Stranger: "Awww, come on."

Me: "Nope."

Stranger: "Not even for $10k?"

Me: "Nope."

Stranger: "$10k Cash!"

Me: "Nope."

Stranger: "Look I've got cash on hand!" (Pull $10k right out of his pocket)

Me: "Nope!" (I was started to get a little agitated at this point)

Stranger: "Fine..." (starts to get back into his car)

Me: "Adios."

I was probably a little bit of a jerk with my short responses. I didn't really feel comfortable with a guy I don't even know, never seen, or talked to come and park onto my property wanting to buy my car that's always parked in my garage. He must have driven by my house a couple times to know what's in there. It felt a little stalker-ish and that really left a bad taste in my mouth. I'm a little over protective of my belongings and things I care about (family, privacy, home, etc.). The road to my house is on a steep incline and ends maybe 5-6 houses down so we don't get much traffic. Also, the car is parked in a closed garage most days so it rarely gets seen.

To me, it would have been more understandable if my car was actually running and driving and parked at a car cruise before someone asks about buying my car. I guess I wouldn't want to sell it in any other condition.

I have a weird emotional attachment to it. I've had my good and bad times with the car. Right now I'm in the middle of a huge build. I just installed an 8 3/4 that has been completely gone through. My friend is almost done redoing the brake lines. We're about to install the rest of a Hotchkis TVS. I've got a big brake kit ready to go into it. I've already invested way more than $10k. On top of that, selling it now would make the car pointless. I originally bought the Dart to learn the mechanics of cars by actually working on it. Why would I give up mid build and take the easy route out? I certainly wouldn't be learning as much as I am now. Plus it's my work that's going in the car and that's something I'd like to be proud of.

Anyways, I'm having fun with the car right now. I get to spend time with my friend and make something cool. Plus, this is my only hobby, at the moment, to keep me occupied while I'm on my summer break. Without the car, I'd go insane due to utter boredom.

It's kind of strange how he just through a value out without ever looking at the car up close. Idk, this is just a new experience for me, I guess.
 
When I put that exact same flip top cap on my 68, I used the two holes that are in line with eachother, and drilled two more to the same distances as the holes already in the fuel neck, then transfered the holes to the adapter. You wind up with quite a few holes in the cap base, but it works good.

http://s43.photobucket.com/user/serj22/media/CAM01944_zps8f00605f.jpg.html

I just drew an "X" on the adapter where the screws were on the fill neck, then measured the distances from center, and it worked in the first try for me.

http://s43.photobucket.com/user/serj22/media/CAM01946_zpsbbd572f2.jpg.html
I just used 4 longer metal screws through the cap base, adapter, body panel, and fuel neck, and it doesn't raise the cap or affect anything at all. Been on there 6 months. I do advise using a sealer of some kind between the adapter and body, first time i filled up without sealing it at the pump I did not notice I was draining a nice waterfall of gas down the side of the car.
 
Was doing some work on the Dart today. Got some brake clips in to hold the hard lines. Unfortunately I messed up and set myself back another week. Before I bought my brakes I had bought "restored" 73+ A body Drum brake spindles thinking they'd work with the Doctor Diff kit. Nope, I was stupid and didn't look over the website carefully. Now I've got to order some Repro disc brake spindles tonight. Anyways, after closer inspection, the threads on the spindles I have were a little banged up and had parts of it had been grinded. I've also been stressing too much over which wheels I should get.

This is going to be difficult. School starts a week from today. I've got to get this car on the road before Oct 25 (Fall Fling).
 
-
Back
Top