Later Model Alternators

-

mopowers

Well-Known Member
Joined
Feb 15, 2006
Messages
8,562
Reaction score
4,769
Location
West Sacramento, CA
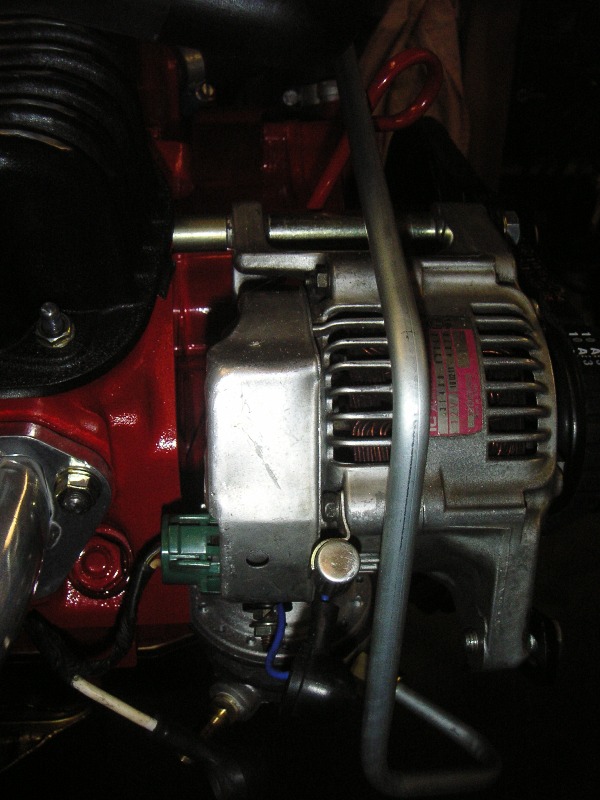
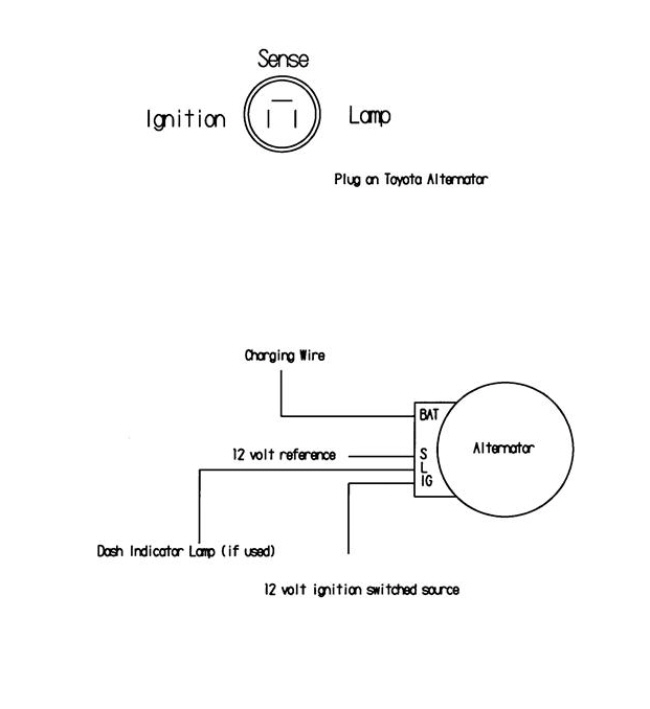
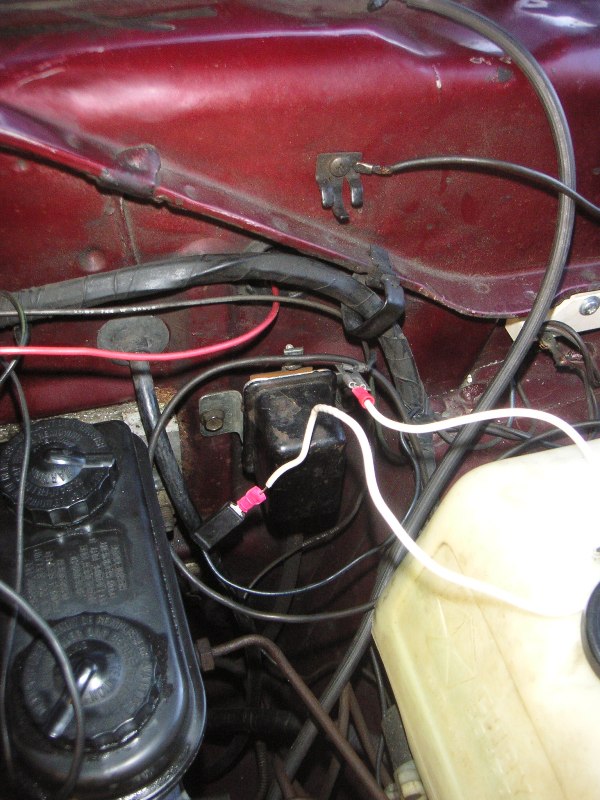
I'm headed out to the salvage yard this weekend for a few odds and ends and figured I'd keep an eye out for a later model alternator that puts out more amps than my stock 60amp round back and wouldn't require a ton of modification to the bracketry. What do you guys use???

I've heard the smaller Denso ones are a decent upgrade. Would it even be worth my effort, or is buying a used alternator a bad idea?
 
Crapshoot. Some densos are easier to mount than others. If you can fabricate, might not matter. Buying used especially electrical is somewhat of a gamble, but so are rebuilts.
 
Hi,

What ever alternator you upgrade to, if it is higher output than a stock unit be ready to do some wiring upgrades. The stock wiring is marginal for even the factory alternators. Big alternators and stock wiring is a good recipe for a fire.
 
I use a alt out of a 89 toyota 4 runner basicly a denso that you see in summit for big bucks. I modified a A/C alternator bracket. Just got a old one from the JY but it didn't last long so went to autozone and got a reman for $60 with a lifetime warranty on my second or third one in 14 years just turn them in and get another.
 
I think Chrysler alterators kept using the "external regulator" design even into the Denso type ones (2 field wire terminals). At least my 1996 2.4L is like that. But, you won't see the regulator since integral w/ the engine computer (I think), but no reason you couldn't use a 1970's Mopar Vreg that I can think of, and external is my preference (easier repair and trouble-shooting). I don't know which ones mount easy. The Magnum engines started using a large aluminum casting for all accessories, so can't use that unless you go to a full serpentine belt setup.
 
I think Chrysler alterators kept using the "external regulator" design even into the Denso type ones (2 field wire terminals). At least my 1996 2.4L is like that. But, you won't see the regulator since integral w/ the engine computer (I think), but no reason you couldn't use a 1970's Mopar Vreg that I can think of, and external is my preference (easier repair and trouble-shooting). I don't know which ones mount easy. The Magnum engines started using a large aluminum casting for all accessories, so can't use that unless you go to a full serpentine belt setup.


Yes in fact I found a webpage on subbing the old reliable 70/later Mopar VR for a failed internal computer one
 
Yes. I like the charging circuit to be close together and "stand alone". In my 1965 Dart, I mounted the Vreg (1971+ style) on the inner fender right beside the alternator. You can easily trace the wires between them, unlike the "disappears into wrapped harness" factory design.

Some like "1-wire" alternators, i.e. w/ integral Vreg. That is probably best if your trouble-shooting will be the "change everything" approach. My M-B cars have that, but are the confusing "Motorola design" used in 70-80's GM cars. Even there, many people try changing the "Vreg-brush" module since much cheaper and easier than the whole alternator, though much harder than our Vreg swaps. The Motorola design requires a small "boot-up current", usually from a dash bulb. When that bulb fails - no charging. My M-B owners manuals actually says that if the dash bulb doesn't light when you turn the key, drive immediately to a dealer. I put LED's in my M-B's, which doesn't flow enough current to boot-up until I rev the engine slightly.
 
This is the mini denso 45 amp out of a Suzuki Samurai

I got that one out of a junk yard and had it checked at the parts store. Been running it for 4 years now. My dash lights do not dim at idle like they did before.

Had to drill out the stud hole just a little larger. And make solid spacer accordingly. Used 68 alternator brackets even. Cut and shortened the slide adjuster bracket.

On my 68 the wiring is super simple:

If you have a 68 square box type regulator, just remove the regulator and connect the input and output.

Then take the green wire to the 68 alternator and connect it to the Ignition "I" terminal. Run a wire from the "S" terminal to a good positive battery source.

Take the big lug to your old alternator and connect it to the big lug of the new Denso.

Done

attachment.php


attachment.php


6514695-2_25_11Sm21.JPG


6514695-2_25_11Sm26.JPG


denso_schem_600.jpg
 
Hi autoxcuda,
Did you bypass the ampmeter? It sounds like you removed old alt and replaced with new alt and bypassed old regulator going through bulkhead, is that correct?
Thanks
 
Nope. I still run the factory ampmeter.

Didn't bypass anything at the bulkhead. Just took my 68 mechanical voltage regulator (61-69 style) out and connected the input to the output.

This was the mock up dry run. Later cleaned the connections and such. Bonehead when I took this picture. I could (and later did) just physically plug the input into the out put without the redundant jumper wire.

6514695-2_27_11Sm17.JPG
 
I've been selling the bracket kits for the 60A Denso alternator for years now. Lots of people have used that kit to install the Toyota alternator onto a SB, BB or Hemi engine. Seems to work great. I've had a 60A Denso on my Coronet for a long time as have most of the Mopar guys I know.
 

Attachments

  • AR022a (Large).jpg
    44.8 KB · Views: 442
Alternator was the only piece of my 90 Geo Prism I kept. I doubt I'll ever use it. Just felt it was worth more than its weight at the crusher.
 
What year / models application would you ask for?

The Denso swap kit has been around for so many years that all a person needs to do is run a Google search and they'll find the information. "Denso alternator for Mopar" or anything like that will find the information.

The instructions are on a PDF that can be downloaded: [ame]http://arengineering.com/wordpress/wp-content/uploads/ARE-AR022-proof.pdf[/ame]
 
The Denso swap kit has been around for so many years that all a person needs to do is run a Google search and they'll find the information.

Thanks for the info, but, no, you can't Google it. I've tried which is why I asked There are so many many many............posts across the www on "I did a Denso swap" that it's just about as effective as searching the words "general motors."
 
I'm running a CS130(100amp) from a 1994 firebird. The mounting points are very close to how a squareback mounts. I just needed to take a dremel to the inside of the mounting bar so I could get it to tighten all the way.

It has a little belt wobble, but I havent tossed the belt yet. I probably just need to add a suppport bar to the outer edge of the alternator.
 

Attachments

  • IMG_0158.jpg
    31.7 KB · Views: 364
I'm running a CS130(100amp) from a 1994 firebird. The mounting points are very close to how a squareback mounts. I just needed to take a dremel to the inside of the mounting bar so I could get it to tighten all the way.

It has a little belt wobble, but I havent tossed the belt yet. I probably just need to add a suppport bar to the outer edge of the alternator.
Well, finally did the denso 90 amp alternator swap on my 65 barracuda with stock brackets and cast iron waterpump. Had been putting it off for years and now its done. Didn't have to change the belt just extended the adjustment arm out about 3 inches with a fabricated extension. Belt lines up too. Went to the squareback alt and upgraded the regulator at the same time years ago. Works great. No more fluctuating headlights at idle and electronic ignition dropping out at low rpm. would highly recommend this upgrade.
 
Well, finally did the denso 90 amp alternator swap on my 65 barracuda with stock brackets and cast iron waterpump. Had been putting it off for years and now its done. Didn't have to change the belt just extended the adjustment arm out about 3 inches with a fabricated extension. Belt lines up too. Went to the squareback alt and upgraded the regulator at the same time years ago. Works great. No more fluctuating headlights at idle and electronic ignition dropping out at low rpm. would highly recommend this upgrade.
Hi,
Which Denso 90A did you use? I have a 66 Barracuda that I would like to do the same. Did you bypass the amp meter or use the stock electrical wiring? Please show picture of Alt. installed if posssible.
Thanks
 
Hi,
Which Denso 90A did you use? I have a 66 Barracuda that I would like to do the same. Did you bypass the amp meter or use the stock electrical wiring? Please show picture of Alt. installed if posssible.
Thanks
Just turned this thing on. I'll send pics tomorrow with explanations of things done.
 
Hi,
Which Denso 90A did you use? I have a 66 Barracuda that I would like to do the same. Did you bypass the amp meter or use the stock electrical wiring? Please show picture of Alt. installed if posssible.
Thanks
After extensive research I used a o'reilly part #13220 for 88-89 dodge trucks and vans. Only thing I had to do was to grind down the ear closest to the pulley a little, enough to fit the stock bracket, wire it up, set the belt tension, extend my adjuster for the belt tension. I know it looks close to the exaust manifold but there is 1/2 clearance near the manifold. I trimed the little stud which holds the guard in place with my dremel tool so that I could rotate it away from the exaust manifold. Been running it like that for the last 2 weeks in this summer heat with no issues. It recovers from starting very quickly. I did not bypass the amp meter. I just cleaned all the connections from the alt, back thru the firewall, to the battery stud. I added a 80 amp maxi fuse along with the appropriate size wire which I got from Summit Racing from the alt to the battery stud. The amp meter is no longer accurate now so I added a volt meter to monitor it. I switched to the dual field alt and voltage regulator years ago. I just added the alt to finish the upgrade.

100_0585_00.JPG


100_0581.JPG


100_0583.JPG


100_0582.JPG
 
Last edited:
After extensive research I used a o'reilly part #13220 for 88-89 dodge trucks and vans. Only thing I had to do was to grind down the ear closest to the pulley a little, enough to fit the stock bracket, wire it up, set the belt tension, extend my adjuster for the belt tension. I know it looks close to the exaust manifold but there is 1/2 clearance near the manifold. I trimed the little stud which holds the guard in place with my dremel tool so that I could rotate it away from the exaust manifold. Been running it like that for the last 2 weeks in this summer heat with no issues. It recovers from starting very quickly. I did not bypass the amp meter. I just cleaned all the connections from the alt, back thru the firewall, to the battery stud. I added a 80 amp maxi fuse along with the appropriate size wire which I got from Summit Racing from the alt to the battery stud. The amp meter is no longer accurate now so I added a volt meter to monitor it. I switched to the dual field alt and voltage regulator years ago. I just added the alt to finish the upgrade.

View attachment 1714951336

View attachment 1714951337

View attachment 1714951338

View attachment 1714951339
Thanks for the pictures and information.
 
... I did not bypass the amp meter. I just cleaned all the connections from the alt, back thru the firewall, to the battery stud. I added a 80 amp maxi fuse ... from the alt to the battery stud. The amp meter is no longer accurate now ...
1963 and 1965 cars don't have the common problem of "melted bulkhead terminals". Those years used special buss-bar feed-thrus for the large ALT and BAT wires. Ditto for C-body and I assume B-body. Adding a fuse is prudent (I did also).

Not sure why your ammeter reading would be affected if it is still the only path to the battery. The only loads that don't route to the battery via the ammeter are a few transient under-hood currents (starter, horn), and some special accessories (spot-light). Right after cranking, you should see + current flow into the battery to recharge it. Might not take long with the bigger alternator and if you didn't crank long.

In my A's, I did a custom setup where battery current routes thru the ammeter, but a parallel path of dual diodes shunts current around the ammeter, starting with ~0.3 V drop across the ammeter (about half-scale). That will hopefully protect the under-dash wiring.
 
-
Back
Top